Check Linux Disk Space Using df Command
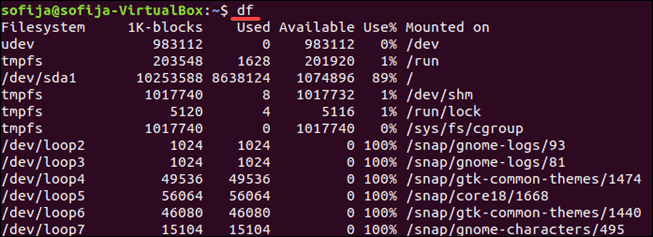
You can check your disk space simply by opening a terminal window and entering the following:
df
The <strong>df</strong> command stands for disk free, and it shows you the amount of space taken up by different drives. By default, <strong>df</strong> displays values in 1-kilobyte blocks.
Display Usage in Megabytes and Gigabytes
You can display disk usage in a more human-readable format by adding the –h option:
df –hThis displays the size in kilobytes (K), megabytes (M), and gigabytes (G).

Understanding the Output Format
The <strong>df</strong> command lists several columns:
Filesystem         Size      Used     Avail    Use%    Mounted on
udev               210M        0        210M     0%       /dev
tmpfs              49M       1004K      48M      3%       /run
/dev/sda2          7.9G       4.3G      3.2G     58%      /
Your output may have more entries. The columns should be self-explanatory:
- Filesystem – This is the name of each particular drive. This includes physical hard drives, logical (partitioned) drives, and virtual or temporary drives.
- Size – The size of the filesystem.
- Used – Amount of space used on each filesystem.
- Avail – The amount of unused (free) space on the filesystem.
- Use% – Shows the percent of the disk used.
- Mounted on – This is the directory where the file system is located. This is also sometimes called a mount point.
The list of filesystems includes your physical hard drive, as well as virtual hard drives:
- /dev/sda2 – This is your physical hard drive. It may be listed as /sda1, /sda0, or you may even have more than one. /dev stands for device.
- udev – This is a virtual directory for the /dev directory. This is part of the Linux operating system.
- tmpfs – You may have several of these. These are used by /run and other Linux processes as temporary filesystems for running the operating system. For example, the tmpfs /run/lock is used to create lockfiles. These are the files that prevent multiple users from changing the same file at the same time.
Display a Specific File System
The <strong>df</strong> command can be used to display a specific file system:
df –h /dev/sda2You can also use a backslash:
df –h /This displays the usage on your primary hard drive. Use the mount point (in the Mounted on column) to specify the drive you want to check.

Note: The df command only targets a full filesystem. Even if you specify an individual directory, df will read the space of the whole drive.
Display File Systems by Type
To list all file systems by type, use the command:
df –ht ext4This lists drives with the <strong>ext4</strong> type, in human-readable format.

Display Size in 1000 Instead of 1024
You can display disk usage in units of 1000 instead of 1024:
du –HThis can address a point of confusion in storage technology. Hard drive manufacturers sell hard drives in sizes based on 1000 bytes = 1 kilobyte.
However, operating systems divide that space up so that 1024 bytes = 1 kilobyte. Because of this, a 1000-gigabyte hard drive ends up with roughly 930 gigabytes of usable storage.
Check Disk Space in Linux With du Command
The <strong>du</strong> command displays disk usage. This tool can display disk usage for individual directories in Linux, giving you a finer-grained view of your disk usage. Use it to display the amount of space used by your current directory:
du
Like the <strong>df</strong> command, you can make du human-readable:
du –hIt displays a list of the contents of the current directory, and how much space they’re using. You can simplify the display with the <strong>–s</strong> option:
du –hsThis shows how much space the current directory uses.

To specify the directory or file, check use the following options:
du –hs /etc/kernel-img.confdu –hs /etcWith the second command, you may have noticed a permission denied error message. This means the current user doesn’t have the privileges to access certain directories. Use the <strong>sudo</strong> command to elevate your privileges:
sudo du –hs /etcNote: If you’re working on CentOS Linux, you may need to use the su command to switch to the root user to access protected directories.
